Releases
OpenSRP FHIR Core releases occur at most once every 2 weeks, i.e. at the conclusion of a sprint. The release process follows the gitlab flow style described in the following diagram:
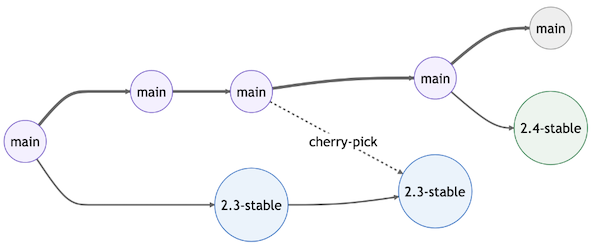
This allows changes to occur on the code release branch while unrelated code continues being merged into main.
Release notes
Release notes provide a summary of the changes, improvements, and bug fixes in each new release. They are an essential resource for developers and users to understand what has been updated and any potential impacts on their implementations.
How to write release notes
To write effective release notes, follow these guidelines:
- Be concise and clear: Summarize the changes in a way that is easy to understand by users and developers.
- Categorize changes: Group changes into categories like 'New Features', 'Improvements', and 'Bug Fixes' for easy navigation.
- Highlight breaking changes: Clearly indicate any breaking changes that may impact existing implementations or require special attention.
- Include relevant issue numbers: Link to the related GitHub issues or pull requests for more context and easier tracking.
Adding release notes to the repository
Before a new release is created, the release notes must be added to the changelog. The changelog is ordered from newest release at the top to oldest releases at the bottom. Follow these steps to add a changelog entry for your new release:
- Update, verify, add to the latest changelog section
- If there is an "unreleased" header, update this to the new release version following the document format
- If there is no "unreleased" header, add one for this new release version
- Update and add to the release notes in this section following the guidelines mentioned above.
- At a minimum, the release notes must link to and include the title text from the the newly closed issues, excluding any testing, doc, or cleanup issues that are uninformative or immaterial to the changes.
- Commit and open a PR for your updates to the changelog.
Viewing release notes
Release notes can be viewed in the changelog.
Code releases
To conduct a code release follow the below steps:
- Open and merge a PR to update the project version to the current release version
- e.g. change the
versionNamein theopensrpmodule build.gradle file tov0.2.0
- e.g. change the
- Code freeze: create a branch for the code release version as well as the first code release candidate (labeled RC1).
- For example, for code release version
v0.2.0, create a branchopensrp-0.2.0, a pre-releaseopensrp-0.2.0-rc1, and a tagv0.2.0-opensrp-rc1
- For example, for code release version
- Candidate progression: This is followed by 1-2 weeks of QA and error fixing
- Whenever we find an error in the candidate, open a pull request with a fix for the error against the code release branch (e.g.
v0.2.0) - Once the error is fixed and merged into the code release branch (multiple errors can be batched), create a new tag, e.g.
v0.2.0-opensrp-rc2, the update the pre-release to point to this tag and reflect the RC2 name.
You must also either a) open a PR with the same fix against the
mainbranch, b) open a PR from the release branch into themainbranch after merging the fix into the release branch. - Whenever we find an error in the candidate, open a pull request with a fix for the error against the code release branch (e.g.
- Repeat step (2.) until QA passes, e.g. with more tags, e.g.
v0.2.0-opensrp-rc3..., and updated pre-releases. - Final code release: when the release passes QA, create a final release tag
v0.2.0and update the release to point to this tag and reflect theopensrp-0.2.0name.
APK releases
Once a final code release is created, attach a generic flavor APK release e.g. opensrp-0.2.0.apk to the release. In addition, attach APK releases for any specific flavors requested, e.g. opensrp-0.2.0-bunda.apk, opensrp-0.2.0-ecbis.apk, opensrp-0.2.0-wdf.apk.
Flavors
Flavors define custom names, icons, and default local properties (such as server versions). We use flavors when a particular project or use-cases requires this customization, such as a branded icon and name. When creating flavors do NOT include version numbers. The version of the flavor is defined by the code version.
To add a flavor, add an entry to the productFlavors map in android/opensrp/build.gradle. For example, to add a flavor called newFlavor add the map:
create("newFlavor") {
    dimension = "apps"
    applicationIdSuffix = ".new-flavor"
    versionNameSuffix = "-new-flavor"
    manifestPlaceholders["appLabel"] = "New Flavor App Name"
}
Note, flavor names should always be camel cased
You can add the following resources:
| Description | Location |
|---|---|
| App icon | android/opensrp/src/new-flavor/res/drawable/ic_app_logo.png |
Where the app icon is an image of the appropriate size
APK Release artifact via Github workflows
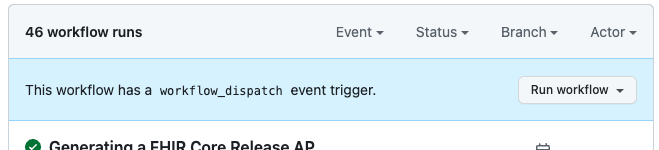
As part of integrating Continuous Delivery(CD) into the development lifecycle, CI is set up to generate an APK.
To Generate an APK or AAB artifact from an existing snapshot of the codebase click on the Github actions tab.
On the left panel select the Manual APK Release workflow.

Click on Run Workflow
This pops up the dialog below where you need to provide inputs specific to your release.
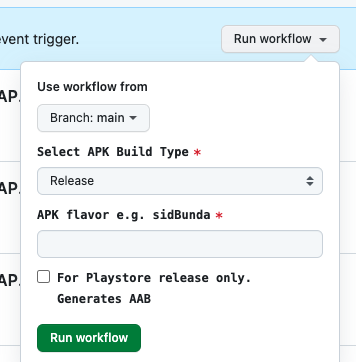
Input required:
- Select the snapshot of the codebase from either a branch or a tag.
- Select the build variant e.g. Release vs Debug variant
- Enter the exact name of the the flavor e.g. sidBunda, zeir . See current list of flavors here.
- If you need an AAB artifact check the box otherwise leave it unchecked to generate an APK artifact.
Click on the Run Workflow button. This will trigger the action to run.
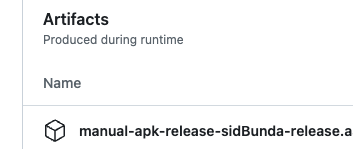
After the action run is complete click on the last workflow run link.

Scroll to the bottom to find the generated artifact download link. Click to download.